SDN for all the networks! Micro-segmentation for virt workloads
Background
Virtualization workloads commonly have to access services on the physical network. Those same users also already have templated images available, with configured IP addresses. Thus, relying on the cluster default network is not an option - only secondary networks are.
Let’s take this a step further; it is good practice to use micro-segmentation to mitigate supply chain attacks - i.e. define using policy exactly what services can a workload access / be accessed from. Thus, even if a component is compromised, it wouldn’t be able to contact the outside world.
The combination of these two features is quite common, and useful. And up to
now, impossible to have in Openshift: there simply wasn’t support for Kubernetes
NetworkPolicy on secondary networks, least of all on the SDN solution offered
by Openshift.
This blog post will explain how to configure a secondary L2 overlay connected to a physical network, and how to specify exactly what the workloads attached to these physical networks can do - i.e. which services can they access / which services get to access them.
Requirements
- an Openshift 4.14 cluster
- kubernetes-nmstate >= 2.2.15
- CNO configuration:
- enabled multi-network
- enabled multi-net policies
- OVN-Kubernetes plugin
- a postgreSQL DB installed, available in the physical network
Scenario
In this scenario we will deploy workloads (both pods and VMs) requiring access to a relational DB reachable via the physical network (i.e. deployed outside Kubernetes).
For that we will deploy a secondary network.
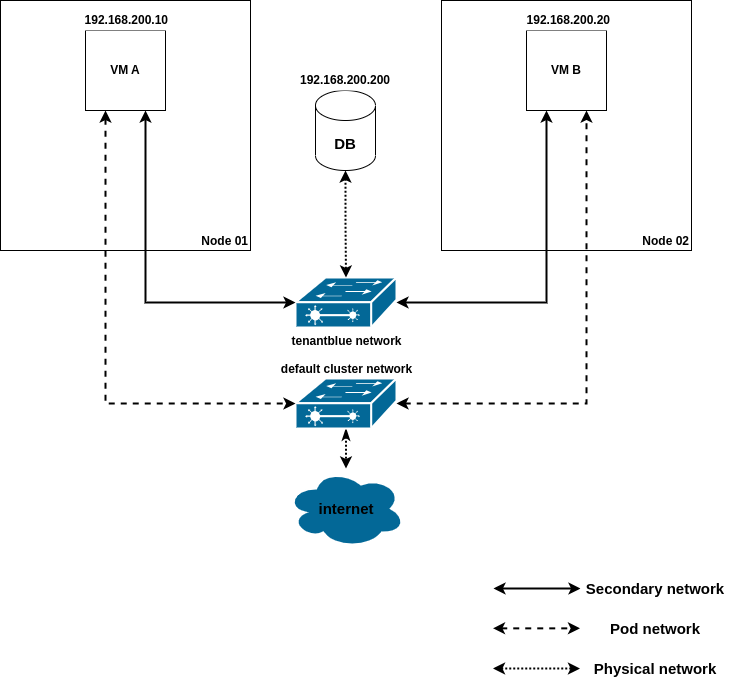
Overlay network perspective
The VMs will be connected to two different networks: the cluster’s default
network, owned and managed by Kubernetes, granting the VMs access to the
internet, and an additional secondary network, named tenantblue, implemented
by OVN-Kubernetes, and connected to the physical network, through which it will
access the database deployed outside Kubernetes.
Both VMs (the the DB) will be available on the same subnet (192.168.200.0/24). The diagram below depicts the scenario explained above.

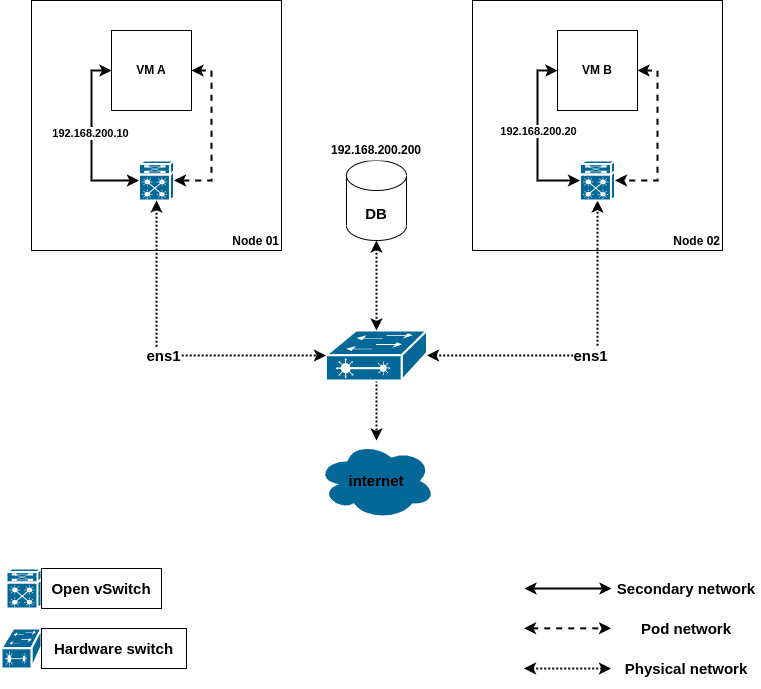
Physical network perspective

Setting up the database
We assume the DB is available on the localnet network.
Let’s just create a new user and database, and grant access to that user to manipulate the database:
sudo -u postgres psql
➜  ~ sudo -u postgres psql
psql (15.4)
Type "help" for help.

postgres=# CREATE USER splinter WITH PASSWORD 'cheese';
CREATE ROLE
postgres=# CREATE DATABASE turtles OWNER splinter;
CREATE DATABASE
postgres=# grant all privileges on database turtles to splinter;
GRANT
postgres=# \connect turtles
You are now connected to database "turtles" as user "postgres".
turtles=# GRANT ALL PRIVILEGES ON ALL TABLES IN SCHEMA public TO splinter;
GRANT
turtles=# \q
Allowing database remote access
We also need to ensure that the database is configured to allow incoming
connections on the secondary network. For that, we need to update the host based
configuration of the database. Locate your postgres pg_hba.conf file, and
ensure the following entry is there:
host turtles splinter 192.168.200.0/24 md5
That will allow clients (on the 192.168.200.0/24 subnet) to login to all databases using username and password.
NOTE: Remember to reload / restart your DB service if you’ve reconfigured it
Provision the database
Now that the database and user are created, let’s provision a table and some
data. Paste the following into a file - let’s call it data.sql:
CREATE TABLE ninja_turtles (
    user_id serial PRIMARY KEY,
    name VARCHAR ( 50 ) UNIQUE NOT NULL,
    email VARCHAR ( 255 ) UNIQUE NOT NULL,
    weapon VARCHAR ( 50 ) NOT NULL,
    created_on TIMESTAMP NOT NULL DEFAULT now()
);

INSERT INTO ninja_turtles(name, email, weapon) values('leonardo', 'leo@tmnt.org', 'swords');
INSERT INTO ninja_turtles(name, email, weapon) values('donatello', 'don@tmnt.org', 'a stick');
INSERT INTO ninja_turtles(name, email, weapon) values('michaelangello', 'mike@tmnt.org', 'nunchuks');
INSERT INTO ninja_turtles(name, email, weapon) values('raphael', 'raph@tmnt.org', 'twin sai');
Finally provision the data file:
sudo -u postgres psql -f data.sql turtles
Creating an overlay network connected to a physical network
The first thing we need to do is configure the underlay for our “new” network; we will use an NMState node network configuration policy for that.
apiVersion: nmstate.io/v1
kind: NodeNetworkConfigurationPolicy
metadata:
  name: ovs-share-same-gw-bridge
spec:
  nodeSelector:
    node-role.kubernetes.io/worker: ''
  desiredState:
    ovn:
      bridge-mappings:
      - localnet: tenantblue
        bridge: br-ex
The policy above will be applied only on worker nodes - notice the node selector
used - and will configure a mapping in the OVS system to connect the traffic
from the tenantblue network to the br-ex OVS bridge, which is already
configured - and managed - by OVN-Kubernetes. Do not touch any of its settings -
all you can do is point more networks to it.
Now we need to provision the logical networks in Openshift. For that, please use the following manifests:
---
apiVersion: k8s.cni.cncf.io/v1
kind: NetworkAttachmentDefinition
metadata:
  name: tenantblue
spec:
    config: '{
        "cniVersion": "0.3.1",
        "name": "tenantblue",
        "netAttachDefName": "default/tenantblue",
        "topology": "localnet",
        "type": "ovn-k8s-cni-overlay",
        "logFile": "/var/log/ovn-kubernetes/ovn-k8s-cni-overlay.log",
        "logLevel": "5",
        "logfile-maxsize": 100,
        "logfile-maxbackups": 5,
        "logfile-maxage": 5
    }'
NOTE: the spec.config.name of the NAD - i.e. tenantblue - must match the
localnet attribute of the ovn bridge mapping provisioned above.
Now we just need to provision the VM workload:
---
apiVersion: kubevirt.io/v1
kind: VirtualMachine
metadata:
  name: vm-workload
spec:
  running: true
  template:
    metadata:
      labels:
        role: web-client
    spec:
      domain:
        devices:
          disks:
            - name: containerdisk
              disk:
                bus: virtio
            - name: cloudinitdisk
              disk:
                bus: virtio
          interfaces:
          - name: default
            masquerade: {}
          - name: tenantblue-network
            bridge: {}
        machine:
          type: ""
        resources:
          requests:
            memory: 1024M
      networks:
      - name: default
        pod: {}
      - name: tenantblue-network
        multus:
          networkName: tenantblue
      terminationGracePeriodSeconds: 0
      volumes:
        - name: containerdisk
          containerDisk:
            image: quay.io/containerdisks/fedora:38
        - name: cloudinitdisk
          cloudInitNoCloud:
            networkData: |
              version: 2
              ethernets:
                eth0:
                  dhcp4: true
                eth1:
                  gateway4: 192.168.200.1
                  addresses: [ 192.168.200.20/24 ]
            userData: |-
              #cloud-config
              password: fedora
              chpasswd: { expire: False }
              packages:
                - postgresql
Access the DB from the virtual machine
PGPASSWORD=cheese psql -U splinter -h 192.168.200.1 turtles -c 'select * from ninja_turtles'
 user_id |      name      |     email     |  weapon  |         created_on
---------+----------------+---------------+----------+----------------------------
       1 | leonardo       | leo@tmnt.org  | swords   | 2023-12-04 13:53:37.004108
       2 | donatello      | don@tmnt.org  | a stick  | 2023-12-04 13:53:37.004108
       3 | michaelangello | mike@tmnt.org | nunchuks | 2023-12-04 13:53:37.004108
       4 | raphael        | raph@tmnt.org | twin sai | 2023-12-04 13:53:37.004108
(4 rows)
Restrict traffic on the secondary network
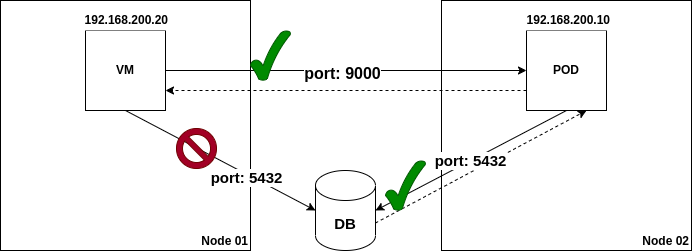
So far, we have access from the VM to the DB running outside Kubernetes. To illustrate the network policy scenario, we will first modernize our monolithic VM by extracting part of its functionality (access to the database) to a standalone Pod. This pod will expose the DB’s contents via a REST API.
Thus, in essence, we will have:
- 1 VM: accesses the DB’s contents indirectly, by querying the pod over its REST API
- 1 pod: DB client; exposes the DB contents over a RESTful CRUD API
- 1 DB hosted on the physical network
- 2 multi-network policies
- one granting access to the TCP port 5432 (port over which the PostgreSQL DB is listening) in the physical network and allowing connections from its subnet to port 9000; this policy applies only to the pod
- one granting access to the pod’s TCP port 9000 (port where the RESTful API is listening); this policy will apply only to the VM
All other traffic will be rejected.
The following diagram depicts the scenario:

To implement this use case, we will re-use the network attachment definition,
NMState’s NodeNetworkConfigurationPolicy, and VM available in
this section.
We will need to provision the database adapter workload; for that, provision the following yaml:
apiVersion: v1
kind: Pod
metadata:
  name: turtle-db-adapter
  annotations:
    k8s.v1.cni.cncf.io/networks: '[
      {
        "name": "tenantblue",
        "ips": [ "192.168.200.10/24" ]
      }
    ]'
  labels:
    role: db-adapter
spec:
  containers:
  - name: db-adapter
    env:
    - name: DB_USER
      value: splinter
    - name: DB_PASSWORD
      value: cheese
    - name: DB_NAME
      value: turtles
    - name: DB_IP
      value: "192.168.200.1"
    - name: HOST
      value: "192.168.200.10"
    - name: PORT
      value: "9000"
    image: ghcr.io/maiqueb/rust-turtle-viewer:main
    ports:
    - name: webserver
      protocol: TCP
      containerPort: 9000
    securityContext:
      runAsUser: 1000
      privileged: false
      seccompProfile:
        type: RuntimeDefault
      capabilities:
        drop: ["ALL"]
      runAsNonRoot: true
      allowPrivilegeEscalation: false
Note: the image specified above was generated by automation on the following repo. It is nothing but a toy.
We will need to provision the following MultiNetworkPolicies:
---
apiVersion: k8s.cni.cncf.io/v1beta1
kind: MultiNetworkPolicy
metadata:
  name: db-adapter
  annotations:
    k8s.v1.cni.cncf.io/policy-for: default/tenantblue
spec:
  podSelector:
    matchLabels:
      role: db-adapter
  policyTypes:
  - Ingress
  - Egress
  ingress:
  - from:
    - ipBlock:
        cidr: 192.168.200.0/24
    ports:
    - protocol: TCP
      port: 9000
  egress:
  - to:
    - ipBlock:
      cidr: 192.168.200.0/24
    ports:
    - protocol: TCP
      port: 5432
---
apiVersion: k8s.cni.cncf.io/v1beta1
kind: MultiNetworkPolicy
metadata:
  name: web-client
  annotations:
    k8s.v1.cni.cncf.io/policy-for: default/tenantblue
spec:
  podSelector:
    matchLabels:
      role: web-client
  policyTypes:
  - Ingress
  - Egress
  egress:
  - to:
    - ipBlock:
      cidr: 192.168.200.0/24
    ports:
    - protocol: TCP
      port: 9000
  ingress: []
After provisioning the multi-network policies above, you will see the VM workload is no longer able to access the DB (the command below hangs):
[fedora@vm-workload ~]$ PGPASSWORD=cheese psql -Usplinter -h 192.168.200.1 turtles
But, it can access the db-adapter workload we’ve just deployed:
curl -H 'Content-Type: application/json' 192.168.200.10:9000/turtles | jq
  % Total    % Received % Xferd  Average Speed   Time    Time     Time  Current
                                 Dload  Upload   Total   Spent    Left  Speed
100   481  100   481    0     0   6562      0 --:--:-- --:--:-- --:--:--  6589
{
  "Ok": [
    {
      "user_id": 1,
      "name": "leonardo",
      "email": "leo@tmnt.org",
      "weapon": "swords",
      "created_on": "2023-12-12T12:46:26.455183"
    },
    {
      "user_id": 2,
      "name": "donatello",
      "email": "don@tmnt.org",
      "weapon": "a stick",
      "created_on": "2023-12-12T12:46:26.457766"
    },
    {
      "user_id": 3,
      "name": "michaelangello",
      "email": "mike@tmnt.org",
      "weapon": "nunchuks",
      "created_on": "2023-12-12T12:46:26.458432"
    },
    {
      "user_id": 4,
      "name": "raphael",
      "email": "raph@tmnt.org",
      "weapon": "twin sai",
      "created_on": "2023-12-12T12:46:26.459101"
    }
  ]
}
Conclusions
In this blog post we have seen how the user can deploy a VM workload attached to a secondary network that requires access to a service deployed outside Kubernetes - in this scenario, an SQL database.
We have also seen how to use network policies to restrict access in this secondary network, only granting access to the DB to selected workloads, and also ensuring our VM workload can only access applications on a particular port on the network.